NortelBCM
To configure the Nortel BCM you must have VOIP Trunk or SIP Trunk keycodes.
The VOIP Trunk (H323) keycode is a bit more expensive and allows both H323 and SIP type trunks. The SIP Trunk keycode only allows for SIP trunks.
Your number of trunk licenses will determine the maximum number of simultaneous IP trunks that can be used.
H323 Trunks are commonly used for linking together different BCM systems to form a private network. Usually a BCM in a branch office or another building is linked using H323 trunks. Private networking can also be done with SIP trunks but the support for H323 has traditionally been better integrated and has a longer history.
To check the keycodes on your system Log in with Business Element Manager and view Configuration->System->Keycodes H323/SIP keycodes are labeled: VoIP Gateway Trunk SIP keycodes are labeled: SIP Trunk 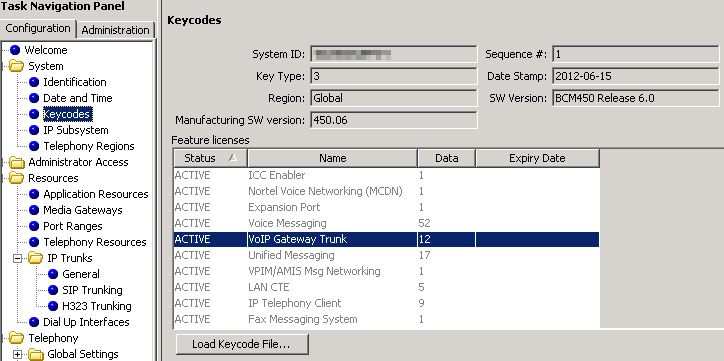
To configure the Trunk go to Configuration->Resources->IP Trunks->General Under IP Trunk Settings I have it set for: Forward redirected OLI: First Redirect Remote capability MWI: checked Send name display: checked Ignore in-band DTMF in RTP: unchecked 
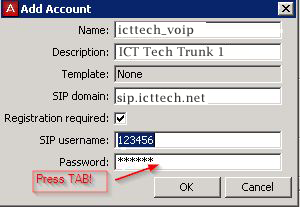
To configure your SIP trunk start by creating the Account Go to Configuration->Resources->IP Trunks->SIP Trunking Click on Add. Choose No Template... Name: A short name you will see in a few places to identify the account (No spaces, only certain special characters are allowed) Description: A longer description you can use to be more specific. SIP Domain: use the server name of your icttech.net account. eg: chicago.icttech.net or seattle.icttech.net Registration required: checked SIP username: this is your icttech.net account number or subaccount Password: Your account or subaccount password. PRESS TAB when you type in the password, do not just click on OK. You must press tab or click on another box to make the password confirmation screen come up.
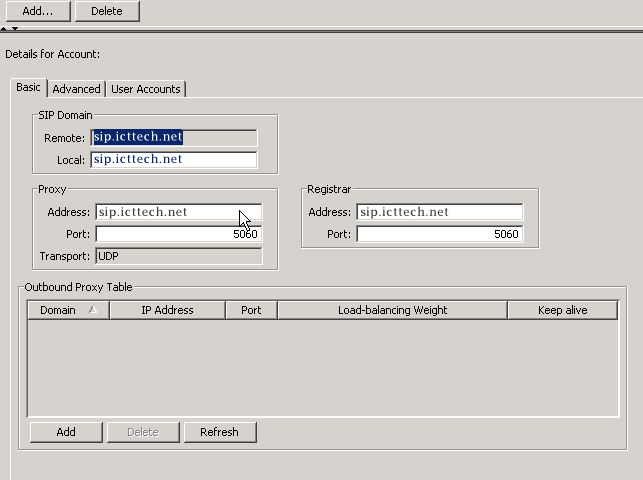
Once added you can choose the account and below are more options to configure. On the Basic screen the Proxy can be set to the server name of your server. The registrar is also the server name for your server Set the ports to 5060 You likely do not need an outbound proxy. (Unless you have a fancy firewall at your office with a SIP proxy feature)
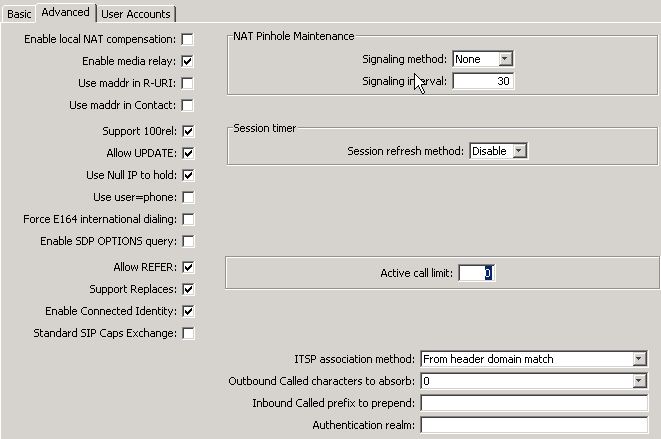
Under Advanced I have: Enable local NAT compensation: Unchecked (You can try turning this on if you have STUN setup in Configuration->System->IP Subsystem if your router doesn't forward SIP sessions properly) Enable media relay: checked Use maddr in R-URI: unchecked Use maddr in Contact: unchecked Support 100rel: checked Allow UPDATE: checked Use Null IP to hold: checked Use user=phone: unchecked Force E164 international settings: unchecked Enable SDP OPTIONS query: unchecked Allow REFER: checked Support Replaces: checked Enable Connected Identity: checked Standard SIP Caps Exchange: unchecked
NAT Pinhole Maintenance, Signaling Method: NONE, Signaling interval: 30 Session timer, Session refresh method: Disable Active call limit: 0 (You can set this to 2 if you have an unlimited residential account to limit you to 2 channels)
ITSP association method: From header domain match Outbound Called characters to absorb: 0 Inbound Called prefix to prepend: blank Authentication realm: blank
Under User Accounts There should be a parent user account here already from adding the account You can add more accounts. I have not played around with this but you should be able to add multiple subaccounts in this section if you have multiple DID accounts you want to setup in your system. The description of the parent account will be blank, you can leave it blank or add something if you like. You can override the caller ID info here. You may need to experiment with these to get your preferred results on what numbers show up on inbound and outbound calls.
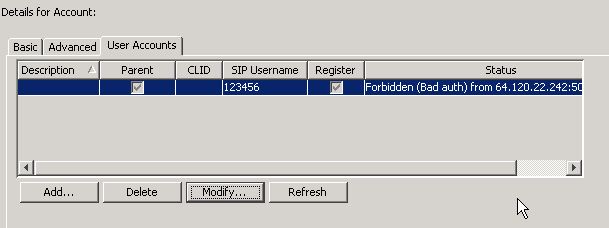
The most useful part of the User Accounts window will be the registration status. This is where you look to see if your BCM has connected to the icttech.net service. You can also check the corresponding registration status on your icttech.net online account page.
The username and password is just an example so it gives me a forbidden message when trying to register.
This is a real username that is working.

Once registered you should be able to call into your system. Without any routing info it should ring on your prime set. You can use the BCM Monitor utility to view the inbound call in the Line Monitor screen and once you pick up you can view the details of the RTP connection in the RTP Sessions tab.
For more info on further setup tasks like setting up call routing, destination digits, and other BCM specific configuration info you can check the online documentation at support.avaya.com There are some example configurations for other IP service providers that are similar to using icttech.net
For example check this one: Avaya application tech note for implementing SIP trunking with BT

