Disclaimer: Talkswitch Fortivoice System is not 100% guaranteed to work with icttech.net. The following
configuration is the result of several real tests and feedback from our customers. This is by far the most reliable
configuration that we have been able to acquire. Please follow the instructions as explained and contact us if you
have any additional information or questions.
|
Configuring TalkSwitch for icttech.net VoIP Service
This guide will show you how to set up icttech.net VoIP service.
When you open an account with icttech.net, we will provide you with account credentials information. Use this information to set up the service provider profile and VoIP numbers on your TalkSwitch system.
Setting up a service provider profile
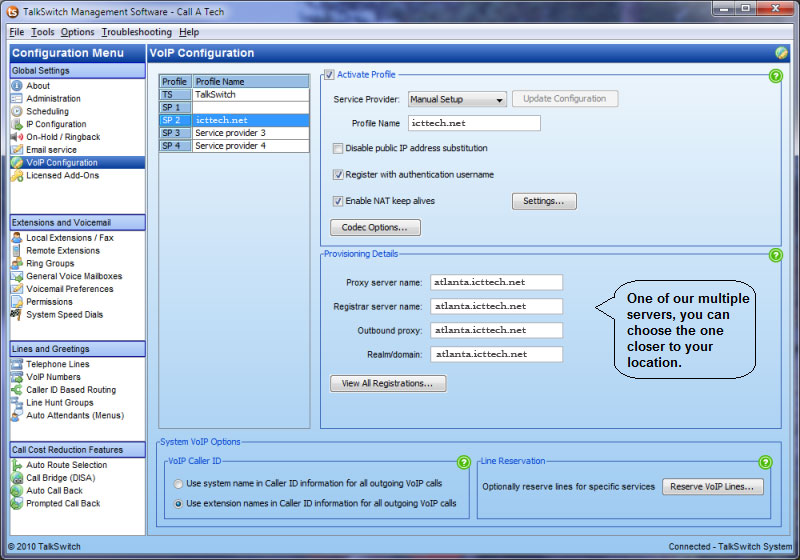
1. Select the VoIP Configuration page.

2. Select a Profile (SP 1 to SP 4) that you wish to assign for FortiCall.
3. Select the Activate Profile checkbox.
4. Under Service Provider select Manual Setup.
5. Click the Update Configuration button. The essential settings will be completed automatically.
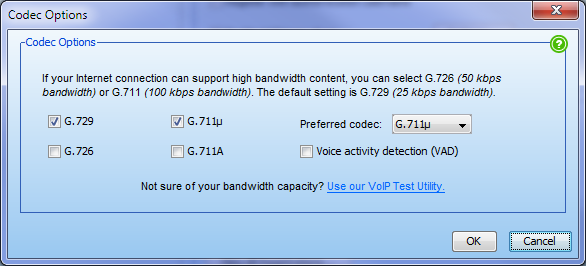
Disable public IP address substitution leave this unchecked. Check Register with authentication username. Check Enable NAT Keep alives (You can keep the default NAT settings) Codec Options: Here make sure to select only the codec supported for icttech.net (g.729 and g.711u). And if you have enough bandwidth you should select the g.711u as Preferred codec.

Provisioning Details
- Proxy Server name: server.icttech.net (one of the icttech.net servers, e.g. atlanta.icttech.net)
- Registrar server name: same as above
- Outbound proxy: same as above
- Realm/domain: same as above
Configuring Outgoing calls with icttech.net
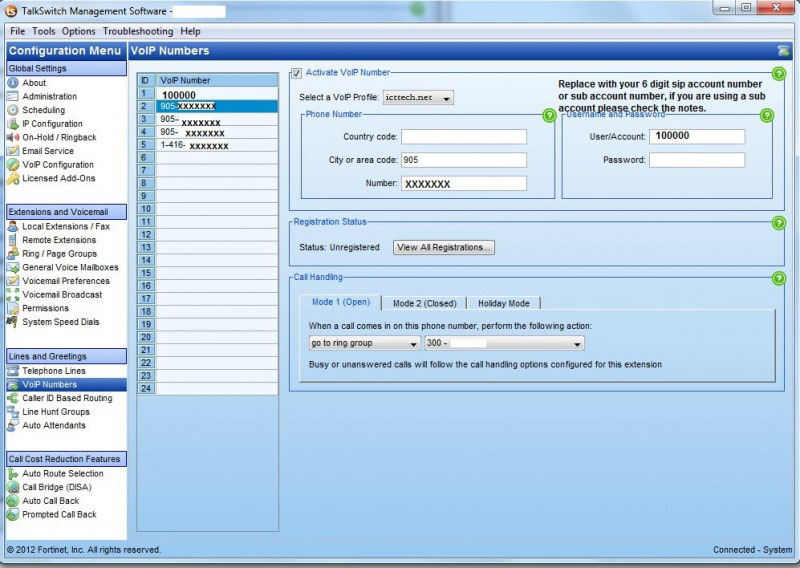
- Select the VoIP Numbers page

- Select one of the empty voip number slots and then check the Activate VoIP number
- Select a VoIP profile: Here select the profile to create for icttech.net
Please enter your Main Account SIP userID as shown in the screen, this is required as this section sends the correct information required from our servers on the INVITES:FROM which will be the userid, if you don't add this record the Talkswitch will be sending the number (DID set) instead and this will result in continuous 'deregistrations' = registration dropping.
Username and Password
- User/Account: 100000 (Replace with your Sub Account username, 123456_sub)
- Password: (the password for your account. If you're using the main account this is the same you use to login to your Customer Portal, unless you change the password, if using a sub account you'll notice each sub account has their own password)
Note You can only use the main account for outgoing calls, this is due to the Talkswitch system not supporting
the Underscore on the sub accounts.
Configuring Incoming calls with icttech.net
Note: You don't need to purchase a DID number for outgoing calls. The VoIP number is used as your CallerID number.

Here you can set the callerID number that you want (or your DID number if you want to receive incoming calls), you need to enter the number filling in the 3 fields.
- Country Code: 1
- City or area code: 555
- Number: 4443322
Note: If you are planning to use more than 1 number with us, as you may know Talkswitch requires you to add different accounts for
incoming. You can use the sub accounts in this section, however on the customer portal you will need to set the sub accounts for IP
authentication and you will have to contact us in order to set all the sub accounts to the same IP address (currently the configuration
will require different IP addresses).

